Showing posts with label patchwork. Show all posts

Monday, May 25, 2015

Parting Ways Quilt Block

I've had this block stuck in my head for a long time and finally decided to bring it to life. This block takes quite a bit of trimming but the end result is worth it. The finished block size is 6.5" but I will try to come back later and post a size chart for larger blocks. If you make this block, use #partingwaysblock on Instagram so I can see!


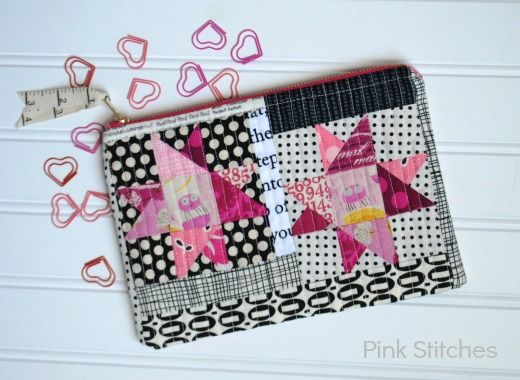
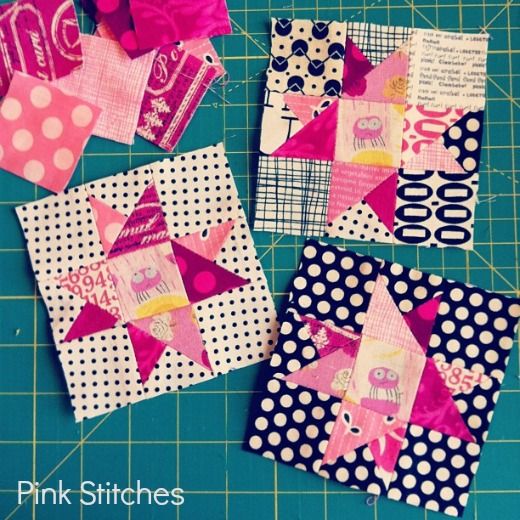
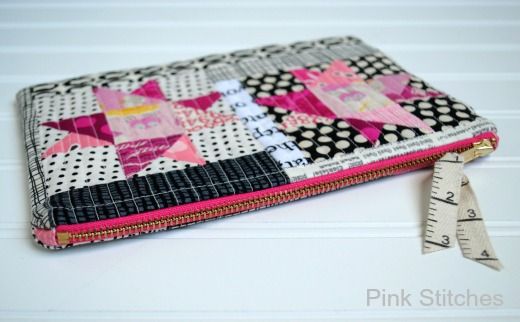
The cool thing about this block is that you can mess around with it and create different layouts. I settled on the "kaleidoscope" effect for the pink quilt that I made.


Here is what you'll need:


- Two 5" squares
- Two 7" squares

First, you'll need to draw a diagonal line across the smaller squares to create your HSTs.


Stack both 5" squares on top of each other, right sides together, and sew at 1/4" on each side of the penciled line.


Slice in half along the diagonal line you drew.


Press open and trim at 4.5"


Now slice each of your HSTs diagonally, perpendicular to the line you have sewn.


Place one of the halves on a corner of the larger 7" square, right side up.


Line up your ruler to 1/4" over your corner.


Holding the ruler down, fold over your corner and mark a line along the ruler's edge on your 7" square.


Now draw a line onto your corner 1/4" from the long edge.


Place the corner on top of the 7" square, wrong side up, making sure to line up the two lines you drew. Pin in place.


Trim off the excess corner of the 7" square and then sew down the line you drew. You should be left with a 1/4" seam.


Repeat with other corner and both corners of remaining 7" square. Press seams open and square off to 7".


Draw a line diagonally on the wrong side of one of your squares.


Stack your two 7" squares, right sides together, and sew at 1/4" on each side of the penciled line.


Slice in half along the diagonal line you drew.


Press seams open and trim finished square at 6.5".


And you're finished! I hope this wasn't too confusing. Don't forget to use the hashtag #partingwaysblock on Instagram if you make this block. I'd love to see different variations of this! Happy sewing :)


Monday, May 6, 2013

Texty Churn Dash Quilt


I am so in love with my new quilt. I finished it early last month but haven't been able to blog about it until now. Hubby got me a new laptop for our 8 year anniversary (yay!!) so I'll be able to blog more and work on some new patterns.


For this quilt, I made twenty 12" blocks using a variety of pink, yellow, grey and texty fabrics. I have always loved the churn dash block and have used it on smaller projects like bags and pouches but decided it was time to make a cozy quilt out of them. I really enjoyed fussy cutting some of my favorite prints for the centers of each block. I think my favorite block is the yellow dog print with the pink frame. Why are Heather Ross prints so adorable?!?

Quilt Stats
block: church dash
fabrics used: variety of designer prints (heather ross, melody miller, echino, etc)
completed size: approx. 48" x 60"
binding: machine stitched in front, hand stitched in back
quilting: vertical straight lines along seams

Monday, February 18, 2013

Spiders


This month, I participated in Ros's Sweet Pouch Swap over at her blog. My swap partner lives in Australia and said that she wanted something with a pink/black/white combo. I pulled out my scraps and made these adorable star blocks.


I can't get enough of the scrappy look lately. I've been using it a lot with my projects lately. I love the combination of scrappy patchwork and straight line quilting.


I hope she enjoys this little pouch along with all the Mexican candy I sent her. I'll be back later this week for the Love Day Swap features!

Thursday, January 17, 2013

Square in Square Pillow

I am so behind on blogging about my sewing projects. I've been spending all my free time watching Catfish and reading books. This is a pillow I made sometime last year before my bloggy break. If you follow me on Instagram (@greenletterday), I'm sure you've seen it before.


I used Tamiko's paper piecing template and fussy cut some of my favorite novelty prints to make nine blocks. At first I wasn't sure if I wanted to make a pillow or a mini quilt but when I pieced them all together, I knew it had to be a pillow. I chose not to quilt it for fear of taking attention away from the beautiful design of the blocks.


I used a regular 14" zipper to piece a really quick pillow back. I love the simplicity of it (not to mention how easy it was).


I'll be back soon to share some more projects with you. Have a great weekend!

Thursday, October 25, 2012

Paper Piecing

It all started with this little block.


I hadn't anticipated the corners being chopped off as I was piecing it together. I ended up making a quick zippy out of it but was still unsatisfied with the result. I posted the picture on Instagram in search of some advice and was pointed towards paper piecing. Deep down, I knew this was the solution but was hoping there was another way. I have been terrified of trying paper piecing! The more I thought about it though, the more I realized how silly I was being. I started sewing as a way to challenge myself but somewhere along the way, I stopped doing just that. I stopped teaching myself new things and stuck to playing it safe. So I looked up a few YouTube videos and this foundation paper pattern by Patchwork Notes and I practiced until I got it right!


After awhile, it wasn't so scary anymore! In fact, it was quite addicting. I went over and bought the Sew Ichigo "Latte To Go" pattern and sewed it right up!


Could this pattern be any more perfect for a mug rug?? I didn't think so. I hope you've been inspired to face your sewing fears and challenge yourself to try new things! Have a fabulous weekend!

Sunday, October 14, 2012

A New Fall Bag

I'm taking a break from all the Halloween posts to show you my new fall bag. I had been hoarding this gorgeous Anna Maria Horner print for something special and decided it was time to cut into it.


I couldn't be more pleased with the results. I paired it with a new print from her Field Study collection. I love how easy it is to mix and match all of the AMH lines.


I got the pattern from this book. It's called the Floral Bag and it's really easy. I think I like it because it's very similar to my Hellen Bag. This is the "small version" and it's quite big so I can't even imagine how huge the "large version" is.


I also finished my fall quilt top this week! Wooo! It took me a few months to finish the blocks but since I didn't get to go to Sewing Summit, I decided I might as well be productive and get them done!


I sewed up a quick patchwork backing yesterday so it's all ready to be basted and quilted. The pattern is called Skipping Squares by Cluck Cluck Sew. I'm so excited to pull it out of the dryer and snuggle up with it! Hope you're having a great Sunday!

Wednesday, September 19, 2012

Halloween Goodies

I've been working on some fun goodies for the Halloween Swap. I really enjoyed making the jack-o-lantern boxy pouch awhile back and I wanted to see how it would look in a patchwork version. I love them both! I also made another crocheted flower trivet in Halloween colors. So fun! Have you started any Halloween or Fall projects?


Anyone up for a Halloween giveaway? What would you like to win??