
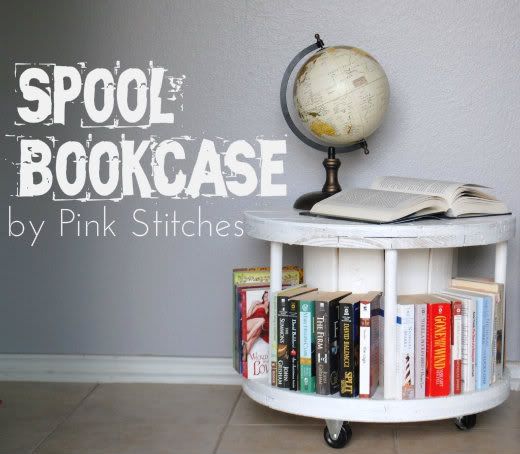
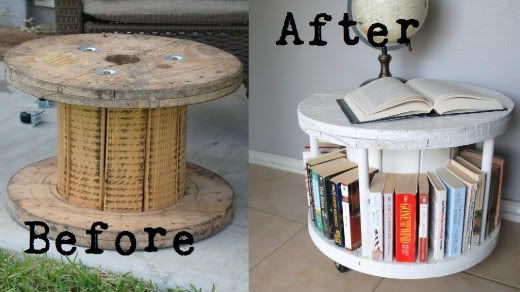
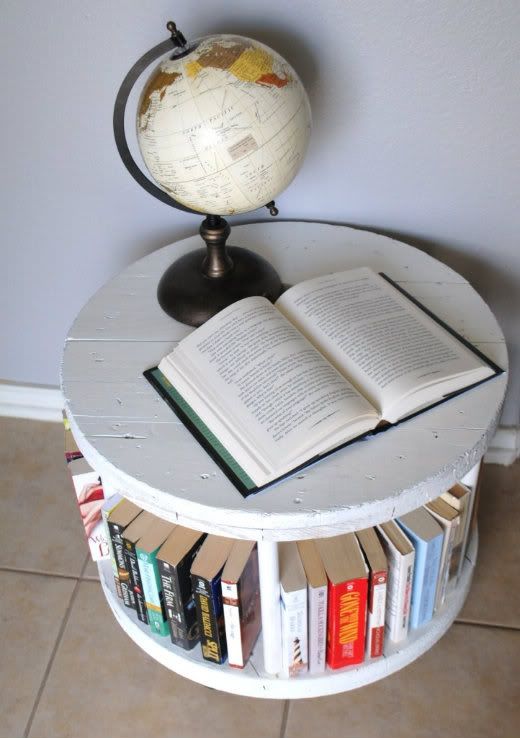
I'm pretty sure most of my spending money goes towards books and fabric. I have more books than I know what to do with and probably ten more books on the way from Barnes & Noble as I'm typing out this post. What do I do? Get rid of some? Nonsense! Make room for more!! This bookcase was inspired by this lovely pin that I stumbled upon a few months ago. My hubby has a bunch of these fabulous spools at work and I made him bring me one this week so I could make this beauty!
Here is what you'll need to make your own:
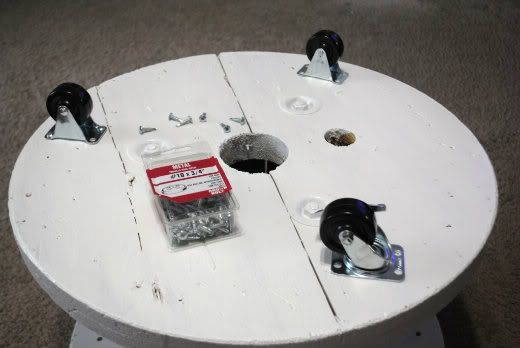
- A small cable spool
- Wooden dowels
- 3 to 4 casters (swivel wheels)
- Molding glue
- Saw
- Measuring Tape
- Paint
- Drill and screws
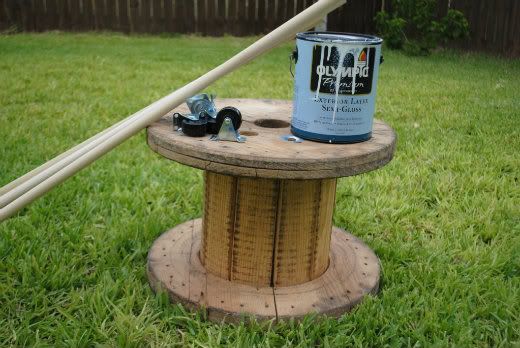
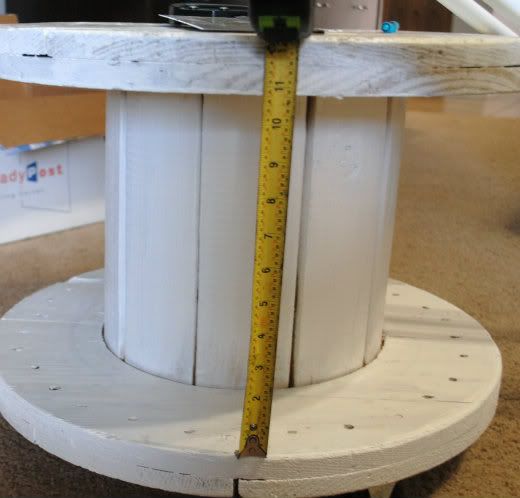
I've been asked where you can find these types of spools. They come in a variety of sizes, this being the smallest one. Mine measured a little over 1 foot. These types of spools or reels are used for cable or electrical wire so you might want to check your local Home Depot or ask your electrician if they have any they're throwing out. My husband works in the oil field and they are everywhere so it's easy for me to get my hands on one.
To get started, you'll need to paint your spool and your dowels. I used a white Behr paint with the primer already mixed into it. I tried covering up one side of the table using four coats and did not like the result. The flaws stood out a lot more (and not in a good way). I painted the other side with only two light coats and loved it. It has a beautiful vintage and worn look.
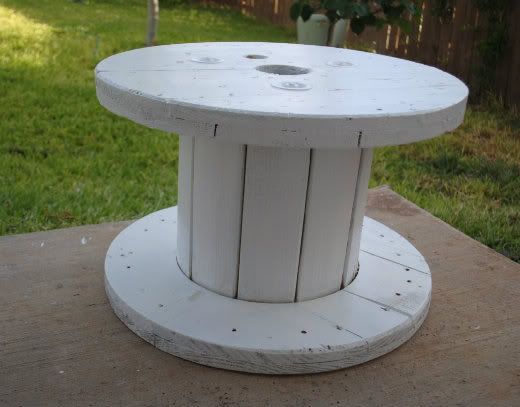
After it dries, turn it upside down and position your caskets where you want them. This picture shows three wheels but I ended up using four so it wouldn't topple over. Just drill them into place.
Next, measure the gap between the top and the bottom of the table. This will be the size your wooden dowels should be. Using the saw, cut about 5-6 dowels.
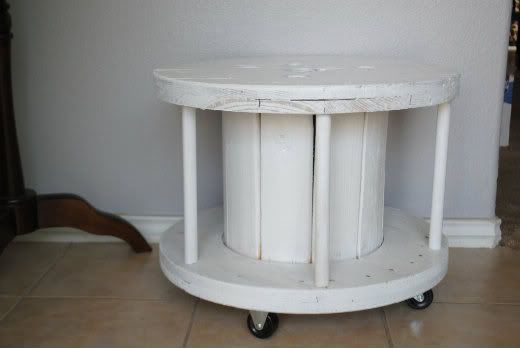
Using molding glue, position and place the dowels around the table about a foot apart and hold in place while they dry. If you cut them down to the perfect size, you don't even need to hold them. They should just stand on their own.
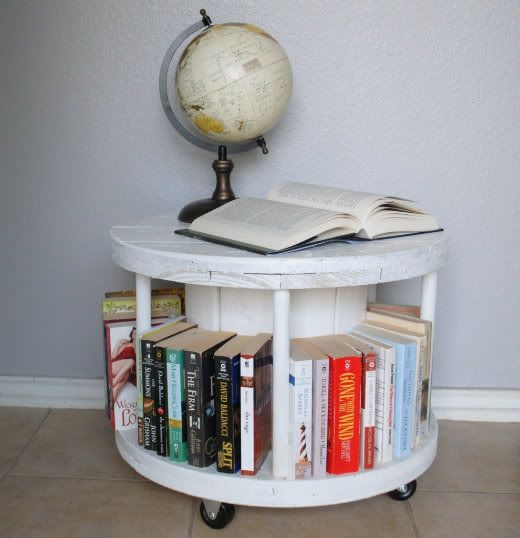
Now fill it with books and admire your new bookcase!! It's not too fancy, but it's cozy and it makes me smile. Enjoy!
**If you have used any tutorials by Pink Stitches, please post your pictures on the Pink Stitches Flickr Group! I'd love to see your beautiful creations and feature some of my favorite projects!**
This is so cute! I saw something like this on Junk Gypsy and I loved it. Thanks for sharing how your made this!
ReplyDeletelove it im looking for a spool!!!!
DeleteMy hubby and I were so poor when first married....we found two small ones and one large one and stained them and they were our coffee table and end tables for years....very sturdy and rustic went well with what now they call shabby chic decor.....thanks for bringing them back!
DeleteI love that! What a great idea. I remember my grandmother having a spiral bookcase so I've always loved the look.
ReplyDeleteYou did a great job; it looks awesome. Love the globe, too!
ReplyDeleteThis looks so great!
ReplyDeleteWOW! This is GORGEOUS! Wish I could get my hands on one of those spools.
ReplyDeleteJudi
Absolutely the cutest thing. Great idea! thanks for sharing
ReplyDeleteThat is so cool... I would totally buy that. I am not very craft :( Newest GFC follower from Keeping it simple. Love for you to return the follow. I am hosting a Mom's Monday Mingle now. Love for you to join the 100 mom blogs.
ReplyDeletewww.thenaptimereview.com
i always love this idea, and super cute with the globe!
ReplyDeleteI made one of these as well! It is a tad different than the one from pinterest where I also received my inspiration. You did a great job! Here is the link to mine if you would like to check it out. Thanks!
ReplyDeletehttp://www.not2shabbycrafts.blogspot.com/search?updated-min=2011-01-01T00:00:00-06:00&updated-max=2012-01-01T00:00:00-06:00&max-results=10
sharing on my FB page & pinning this - I LOVE IT!!
ReplyDeleteLove this. What a great idea. I have a Blog Hop on Wednesdays, and I would love it if you would link this post tomorrow. You can find it at
ReplyDeletewww.adornedfromabove.com
It is called Wednesdays Adorned From Above Blog Hop.
I hope to see you there. Have a great Day.
Debi Bolocofsky
Adorned From Above
www.adornedfromabove.com
I love this! I hope you'll stop by and add this and any other posts you're proud of to my Wednesday What We Wore, Read, and Made Link party
ReplyDeletemarissa
http://raegunwear.blogspot.com
I wish I had the space and supplies to make something like that, it's so cute!
ReplyDeleteThanks for linking to Take-A-Look Tuesday - you were featured today!!
ReplyDelete--Mandy, www.SugarBeeCrafts.com
I love this! Great use of something that would have landed in a landfill!
ReplyDeleteSusan
I LOVE this!
ReplyDeleteYou are in the Talent Show today over on COM- hugs, jen
ReplyDeleteJust dropping by to let you know that I loved your project and featured it on homework today. Have a great weekend and thank you for linking up on the Inspiration Board.
ReplyDeleteThis is fantastic! Beautiful job!! Thank you for sharing. Visiting from $20 Below Thursday. Would love it if you would share this at my Make it Pretty Monday party at The Dedicated House. http://thededicatedhouse.blogspot.com/2012/07/make-it-pretty-monday-week-5.html Wishing you a grand week. Toodles, Kathryn @TheDedicatedHouse
ReplyDeleteWow this is just gorgeous and so creative! I love it!!
ReplyDeleteVery cool! I added it to my pinboard. I think you meant casters and not caskets. Just don't want anyone to be confused going into Home Depot and asking where the caskets are. :)
ReplyDeleteOops, you're totally right! I made the changes. Thanks for spotting that lol Quite a difference!
ReplyDeleteHi Bonnie
ReplyDeleteVisiting from Suzy's Artsy Craftsy! Your upcycled cable spool turned most adorable bookcase is--well, adorable! I love it, and am pinning it now! Love your sewing projects. If you have a moment, I'd love for you to stop by and say hi at altered-artworks.blogspot.com.
I am so excited to make this !!!!!
ReplyDeleteWhat would be even better is to make more than one (with only the bottom layer with wheels, of course) and stack them to make a full size spiral bookcase. You could probably just glue or screw the layers together.
ReplyDeleteThe revolution is starting - I made one of these too, but bigger to keep my records on. http://www.bagsofcharacter.blogspot.com.au/2012/07/cable-spool-table.html
ReplyDeleteLast time I visited my local tip shop they had five of these cable spools stacked up...I may have bought another to make a rocking chair out of.
I've been searching for these spools as well, so I have to ask, what is a tip shop? I did check out your finished product. It's great! How big/tall is the spool you used?
DeleteThat's awesome. I might make one and drill counterbores for the dowels so they'll be more secure.
ReplyDeleteThis is super super cute! I am so excited because I have wanted a wood working project to tackle, but I don't have a lot of experience! I like that the cost probably won't add up to that much, and that you included a tutorial! WOO-HOO! I think I have seen the spools at our local recycled building materials store!
ReplyDeleteHi, Bonnie! This was a lovely idea, which I am very likely going to steal! I live in Florida, but I get really tired of the "Tropical Beach" stuff. I grew up in New York, and I miss the northern beaches, so I've been slowly redecorating my living room in a sort of New England nautical style. It occurred to me that if I were to attach heavy rope around the top and bottom edges it would look very nautical. Once I get rid of the roommate I'm gonna do this! Thanks for the clear instructions and photos!
ReplyDeletehey, very good really love this :) thx Yo for sharing Bonnie
ReplyDeletejoker159-France
I am seriously speechless and now on a hunt for spools. I definitely want to try this. I am a new follower!
ReplyDeleteI like it! Thank you for sharing!
ReplyDeleteThanks for sharing!! Great idea!!!
ReplyDeleteAdorei a idéia, tenho um desses em casa e não sabia como usar.
ReplyDeleteObrigada Bonnie.
I am really excited to make one of these once I find some empty spools. I'm curious, has anyone every attempted to incorporate a lamp into this as well? With the existing center hole, it should be a snap to do.
ReplyDeleteOh this is such a great idea! My husband works in natural gas and I'm pretty sure he could find me a spool to try this with. It'll just take some convincing that it will look cool in the end. He's not much for the idea of re-doing things for other purposes. I have to just do it so he can see the end result. But anyway I cannot wait to try this!! So glad I found your tutorial :) I need to add some "furniture" to my baby daughter's room. Right now there's just her crib!
ReplyDeleteWhat did you to to clean them off before painting? I have a couple for this project but they have grass inside the spool... Kinda worried about bringing them inside with potential critters and such.
ReplyDeleteThanks for the inspiration!
In a world where trends come and go in the blink of an eye, there's something eternally captivating about the raw beauty of nature. The Fossil Wood Watch for Women masterfully captures this essence, blending organic materials with timeless design to create a piece that's both striking and sophisticated.
DeleteThank goodness I finally found where it originated. :D
ReplyDeleteI'm dying to make this one for me and my daughter's stack of books.Thanks so much for posting this blog. Sure is a helpful tool.
Got any ideas on what to do with one for the garden ?
ReplyDeleteI have 3 spools and no idea what to do with them, but would like something for the garden if poss
Thanks
Ed
I wish I had the space and supplies to make something like that, it's so cute you give a great idea.I have a book shelf like
ReplyDeletethis
When you find yourself looking for an erotic gay sizegenetics for yourself you will look at ads for this service but often you you shouldn't go for a photo of a person who is going getting the sizegenetics. A person is better off going on to a website that hopefully will advertise the male sizegenetics and in many cases persons that are performing the sizegenetics services so that you know what you are getting and what is on hand right up front. You're going to would you like to see a photo of an man who is providing this service for you or perhaps learn the rates that he charges for your erotic gay sizegenetics before you actually engage him towards the male sizegenetics. Right here is the best way to generate genital herpes virus treatments are looking for when talking about such type of service. Like that, you happen to be not disappointed as perhaps you may be in the event you go through an ad service where you cannot view a photo.
ReplyDeletehttp://buysizegeneticsonline.tumblr.com/
brilliant internet sites within tumblr online casino games
ReplyDeleteweb site is brief intended for http://casinoonlinex.wordpress.com casino games online
ReplyDeleteHi, can you please tell me the measurements for your table? Would love to make one!!
ReplyDeleteMuito massa , adorei a ideia . Parabéns
ReplyDeleteWow, how very creative and it looks great too! I've got this linked to my DIY bookshelves post as well today, nice job!
ReplyDeleteComo faço para conseguir esses carreteis de fiação,pq amei os seus trabalhos e quero fazer para minha cASA;aSSIM QUE VC SOUBER POR FÂVOR ME FALE.AGRADECIDA
ReplyDeleteCan you please tell me where I could find one ??
ReplyDeleteI love your tutorial, I featured it on my blog in a roundup on DIY home decoration.
ReplyDeleteI hope it's okay with you. (:
http://thisblackbirdsnest.blogspot.nl/2013/11/home-decoration-diy-roundup-2-style.html
I AM MAKING ONE HAVE LOTS OF THEM BIG AND SMALL WILL SELL CHEAP PLEASE EMAIL IF NEED ONE BERN411@aol.com
ReplyDeleteYour upcycled cable spool turned most adorable bookcase is--well, adorable! I love it, and am pinning it now! Love your sewing projects.
ReplyDeleteI just asked my local community page on facebook and lo and behold within 10 mins I had been offered 2 spools!! Now the fun bit starts!!
ReplyDeleteWe use this types of wheels in our home & garden.I think this is a best option for different types of spring wheels.Thanks
ReplyDeletehigh tech rubber & nylon wheels
adorei a ideia vou fazer, agora meu livros vão ficar acomodados
ReplyDeleteI do Love this Idea and thank you for sharing !!!!
ReplyDeletePink Stitches what size dowel rods did you use for this?
ReplyDeleteWhat type of saw did you use to cut the dowels. Im buying some tools for my workshop. Thanks! You can email me.. Bdennis1914@gmail
ReplyDeleteThis is really awesome idea.Thanks for sharing and keep posting great content like this...
ReplyDeleteElinize sağlık, açıklama ve sonuç mükemmel.
ReplyDeleteBende yapmayı düşünüyorum. Ancak üzerindeki bozuk yüzey nasıl düzelecek bilemiyorum. Siz üstünü nasıl düzelttiniz.Metal uçları sökmeden mi yaptınız.
Mutlu gunlerde kullanın ...
We just tried this out. Our cable spool was a bit smaller and we didn't put on any casters yet, but thank you so much for this tutorial. What a wonderful idea, and our table-bookcase looks great.
ReplyDeleteYour tutorial might be worthwhile, but you ruin it with a layout that has more ads than information.
ReplyDeleteWow! This diy project is so creative.
ReplyDeleteSimplesmente maravilhoso. Tenho o carretel e os livros,vou fazer o mais breve. Obrigado por compartilhar.
ReplyDeleteLoovveee all of these so much!! The idea is ever green :)) also been loving light boxes ATM wish I could get one!!
ReplyDeleteLoved this
Laptop Stand NZ very good
Found your post interesting to read. I cant wait to see your post soon. Good Luck for the upcoming update.This article is really very interesting and effective.
ReplyDeleteWilliam Dominguez
Creo que esta es una de las informaciones más importantes para mí. Y me alegro de leer su artículo. Estoy compartiendo un tema relacionado que es más importante en como conseguir robux gratis
ReplyDeleteI am not sure where you’re getting your info, but good topic. I needs to spend some time learning more or understanding more. Thanks for fantastic information I was looking for this info for my mission.| ice cream aurora
ReplyDelete裸聊直播間 , 裸聊直播間 , 裸聊直播間 , 裸聊直播間 , 裸聊直播間 , 裸聊直播間 , 裸聊直播間 , 裸聊直播間 , 裸聊直播間 , 裸聊直播間
ReplyDeleteWooden Watches for Men | At WoodishSA we have collection bobo bird rainbow wooden watches for men, walnut wooden watch for men, branded wooden watch for men, luxury wooden watches & more to choose
ReplyDeleteHey friend, it is very well written article, thank you for the valuable and useful information you provide in this post. Keep up the good work! FYI, shih tzu hair products , axis bank magnus credit card, a thousand splendid suns pdf,soil pollution essay
ReplyDeletelook at this now
ReplyDeleteWooden watches have become a standout trend for those looking for something different. While traditional timepieces made of metal or leather are still popular, many people are now drawn to the organic, unique beauty of wood. Here's why wooden watches are quickly becoming a must-have accessory in 2025:
ReplyDeleteLooking for a top-notch website design company in Johannesburg?
ReplyDeleteSeveral agencies offer a range of services, from basic website creation to complex e-commerce solutions and custom web applications. These companies focus on creating visually appealing, user-friendly, and mobile-responsive websites that drive traffic and achieve business goals. Whether you're a startup needing a simple online presence or a large corporation requiring a sophisticated web platform, Johannesburg's web design scene has the expertise to meet your needs.
Very helpful recommendations on selecting your bookshelf ! I totally agree, a bookshelf isn’t just a way to store your books, it also provides unique character to any room. I recently discovered really great bookshelf designs at Vibecrafts, and they also had both modern and vintage wooden styles that maintain a solid structure while also retaining an elegant look. It is worth checking out if you are looking for bookshelf inspiration.
ReplyDeleteVery useful article & information on Dining Table Decoration Online from this blogpost. Thanks for sharing from - Dining Table Decor
ReplyDeleteGreat content thanks for sharing!
ReplyDeleteNatural Moss Agate Ring